Hi Everyone,
How are you? I am back and excited to share a few of our favourite SENSORY activities with you all!
Many families have shared their interest in learning more about recreating sensory play at home. My plan today is to share photos of our curious learners and help you set up these provocations at home.
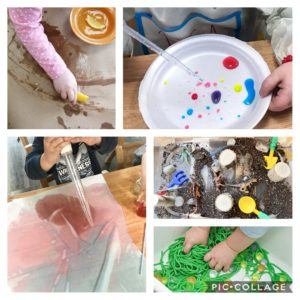
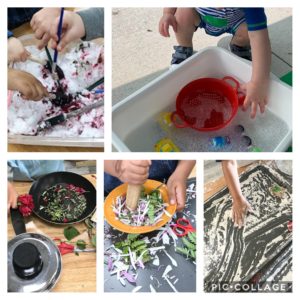
This above photo collage reveals 5 unique sensory opportunities. The one on the top left consisted of frozen fruit and the prints it left on butcher paper. What made this experience so neat, was how the experience transformed as the fruit warmed up within the child’s grasp. The water within the fruit melted and thus changed the entire sensory experience. This experience is a simple one and yet very satisfying to young learners. All we did was cut up fruit and froze them on a baking tray. We then placed them on top of a sheet of butcher paper and watched as our infants created marks with the frozen fruit on paper. This sensory activity is super safe and satisfies all 5 senses.
The photo on the top right and the bottom left consist of children exploring liquids with pippets and turkey basters (large and small). These materials are easy to find. I often find them at Walmart, Dollarama, and Amazon. Pippets/turkey basters draw in and squeeze out liquids. They are great additions to any experiment/sensory experience. Pippets/turkey basters also strengthen fine-motor development, which is crucial during the early years. Sometimes these opportunities can be messy. If messy is not your jam, then that is ok. All you have to do is transfer this activities into the bathtub. It will contain the mess and still facilitate your child’s natural curiosity to pour, mix, create and experiment.
The photos on the bottom right consist of two of our toddler’s favourites. Soil and coloured noodles. Toddlers often love messy opportunities and these two are super messy and engaging!
Now many of you are probably wondering about the noodles and how they were dyed. Ms. Kelly and Ms. Rebecca (both RECE’s at our Innisfil location) use a true and tested recipe. I will later share their recipe with you all.
How many of you have baby cereal in your cupboards? If you do, why not make it (mix with water) and add a small amount of food colouring to the mixture. 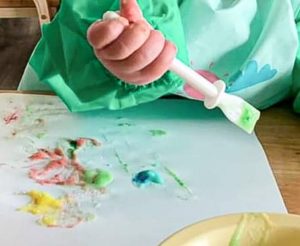 This cereal mixture is now edible paint. IS THIS NOT COOL? I think it is and the coolest thing is, it can be explored by all ages. Materials like paintbrushes, sticks, spoons, cars, rollers, and flowers are all great add-ons.
Who loves flowers?
I do! I love how they look, smell and feel. Just like me, children do too.
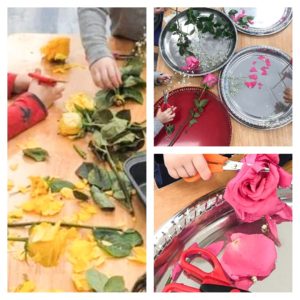
Flowers are great visual stimulants and enhance many sensory activities. Flowers can be incorporated into pretty much any sensory experience.
Tip: Do not throw out dying flowers. Instead, share them with your child. Try adding scissors, mirrors, magnifying glasses, tweezers, playdough and water to any of your flower sensory opportunities.
Does your child love fossils, dinosaurs, and skeletons?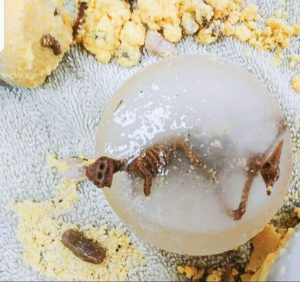
If so, why not try freezing one of those items in a muffin pan. All you need is a muffin pan, water and the item of choice. Once frozen, add a magnifying glass, extracting tool (little hammer, popsicle sticks, paintbrush, tweezer, etc.). I am certain that this experience will have your little one engaged and fascinated for some time.
Playdough, cornmeal, slime, and water are all fabulous sensory options (look at the photos below). All are versatile and can be mixed with any materials.
We at Preschool Canada like adding natural materials like recyclable paper, leaves, twigs, jewels, buttons, tin foil and stones to many of or sensory experiences. Another popular add-on, are containers of all kinds. We know that children enjoy mixing, pouring, filling and dumping.
As promised…
I will now share Ms. Kelly and Ms. Rebecca’s recipe for dying cooked and dry  noodles/pasta/rice.
The trick to it all is using equal amounts of water and vinegar when dying dried pasta/rice. Ms. Kelly suggested that food colour be added once the vinegar is mixed with the water into a small mixing bowl. Ms. Kelly also recommends that you add the liquid slowly to the dry ingredients. Before I continue though, I do need to mention that the best way to dye pasta and rice is by adding the dry pasta/rice into a large ziplock bag. You do not want to do this in a plastic or ceramic bowl. IT WILL STAIN!
Ok, so the liquid mixture is done. Next, you pour a small amount of liquid into the bag. The final step consists of mixing. You really need to MIX MIX and MIX! Ms. Rebecca loves this part and encourages children to participate in this part of the process. Once mixed, the dyed pasta/rice needs to dry. It is best to lay the pasta/rice on a cookie tray lined with parchment/waxed paper. The drying process may take 2 to 4 hours to dry.
Ok, so we now know how to dye dry noodles/pasta. Next, we need to discuss dying cooked noodles/pasta. This process is similar to cooking pasta. The only difference is that the water and vinegar mixture (shared above) needs to be added into the pot of boiling water. Once done, you add the pasta and cook the pasta/noodles as pleased. PRESTO! Dyed cooked noodles/pasta.
Ok, so we now know how to dye noodles/rice/pasta. Next, we will chat about playdough. Playdough is extremely versatile and can be made in many ways. Ms. Melissa V has a favourite playdough recipe and this one is SOFT.
I have attached the website to this blog. Please check it out. If you make it, please let us know how it went. https://pagingfunmums.com/2013/11/01/soft-as-a-cloud-playdoughusing-only-2-ingredients/
Interested in changing up the entire playdough experience?
If you are nodding your head yes, then try adding scents, lemon/orange zest, herbs or flowers to your playdough table. Don’t mix it in. Instead, allow your child to sprinkle, knead or roll the ingredients in. Another way of enhancing any playdough recipe is by replacing half of the flour mixture with any hot chocolate mix, cornstarch or cornmeal. It truly changes the entire sensory experience!
Slime
Now, I don’t know about you, but SLIME has made a serious comeback. Our favourite slime recipe consists of just a few ingredients. Slime is fun, but not recommended for children under 3 or 4 years of age. A great replacement is cornstarch and water. If you have not tried this experiences, please do. It mimics quicksand. It looks solid, but once held, it melts. EXTREMELY NEAT!
Thank you so much for hanging out with me today. I honestly enjoyed sharing a few of Preschool Canada’s favourite sensory activities.
For more information, please email me at innisfil@preschoolcanada.com
Kind regards,
Melissa de Castro
“Play is the highest form of research”